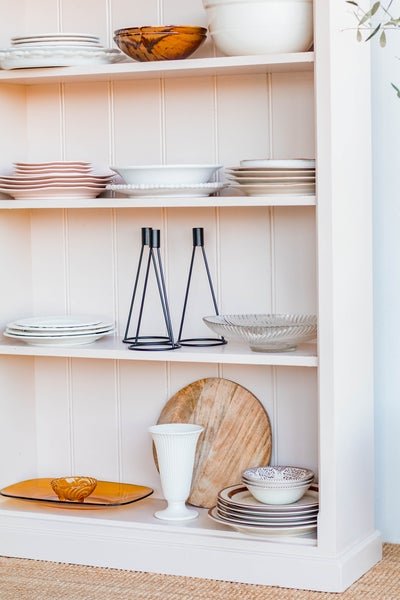
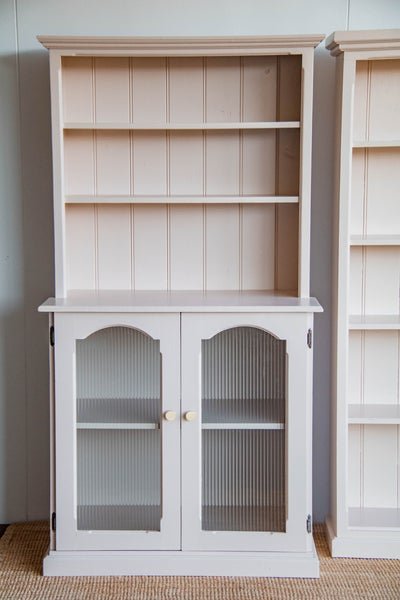
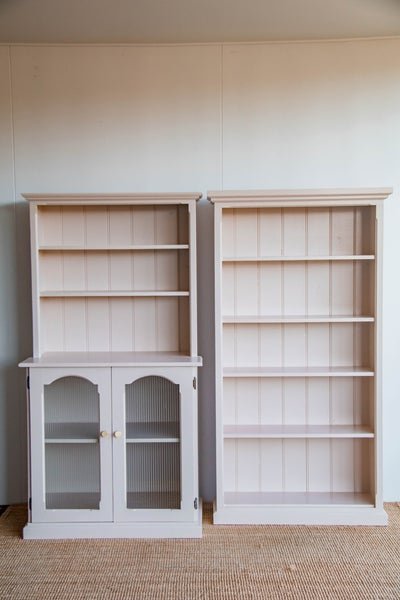
Before & After: DIY Upcycled Bookshelf and Hutch
I can't believe we are finally here - the big reveal! If you haven't already, make sure you check out this quick Instagram Reel I made to share the process of up cycling this bookshelf and hutch. You may remember back in February I bought an old timber bookshelf and hutch off Facebook Marketplace for a steal. $250 total to be exact. I had been looking for a unique piece of furniture to store all my treasured secondhand and thrifted ceramics, kitchenware and glassware for a while and Jason suggested I try Facebook Marketplace. I hadn't been searching for long when I found these gorgeous pieces and they came as a package deal, both which came from a loving home and were custom built back in 1996. The owners were moving into a smaller home in Buderim and no longer needed them, which was great news for me!
Since then, you have been on an epic journey with me over on Instagram helping me make all the decisions with this upcycle project and I honestly could not have transformed both pieces without your valuable guidance. When they arrived I wasn't sure if I should paint them or not, mostly because I loved the warm colour of the stained timber and truthfully, I have never been a fan of painting furniture. It just always looked so flat to me. I threw my conundrum out to you guys on Instagram and you voted I should paint it. And that was that. If I was going to upcycle these pieces, I knew I had to go all in or nothing. Read on to see how I upcycled these beautiful pieces.
Before & After


Canvas drop sheet from Bunnings or an old sheet
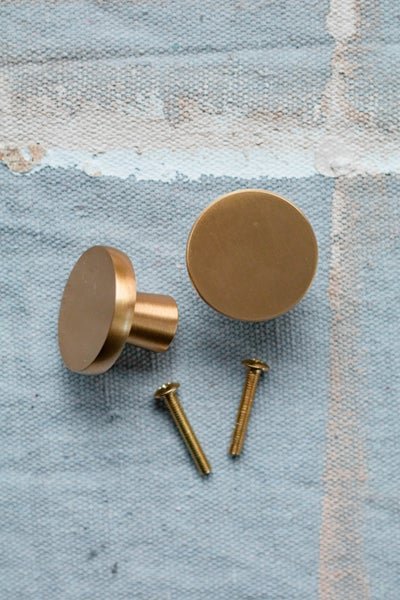
"Pika" cabinetry knobs from ABI Interiors
Rebate power tool from Bunnings
Glass cut to size
Translucent silicone glazing sealant for glass
Screwdriver
Paint scraper from Bunnings
Paint tape from Bunnings
Painting, Painting, Painting
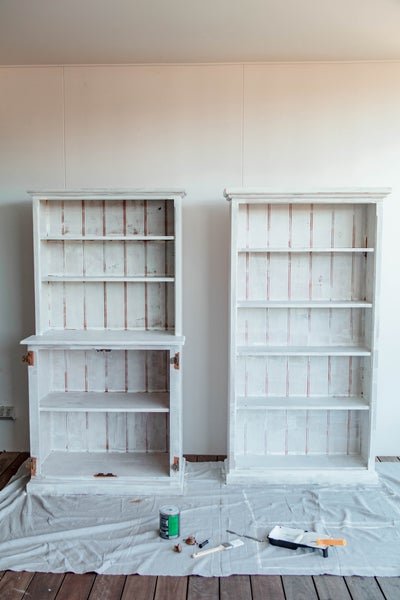
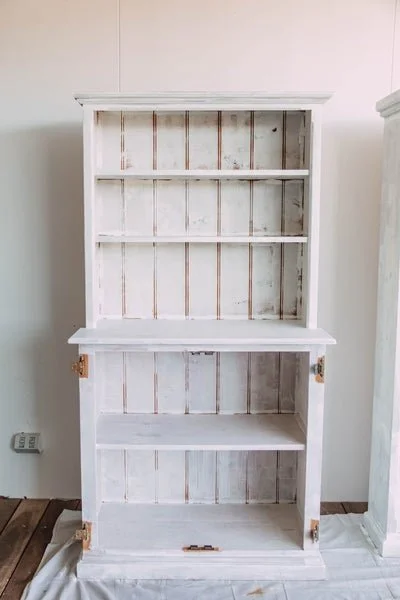
Painting the bookshelf and hutch took me a long time and that's mostly because I had to find any spare time I had in between home life, work life and Celeste's naps to get it done. Having two businesses and two kids, plus "all the other things" doesn't allow for a lot of time to focus on detailed projects like but I got it done and I couldn't be happier. See how the painting came together in this quick Instagram Reel. Here are the steps:
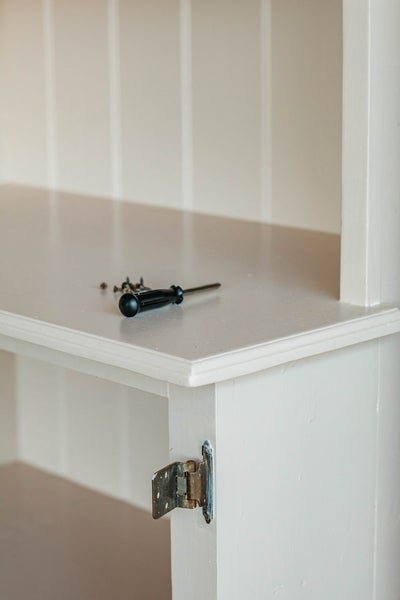
Remove the hutch doors and set the nails, knobs and hinges aside in a safe place. I put mine in a ziplock bag and hidden away from the kids.
Wipe the entire surface clean with a damp cloth.
Sand the surface back using a hand held sanding block/sponge (which I have linked above) with a grit of 80 to 120, as recommended to me by an expert at Bunnings.
Paint two coats of white primer all over the timber (inside and outside) using the roller. The first coat will look very rough and if you have grooves in the panels like my pieces did, you'll need to use a cutting in brush to get into those nooks and cranny's. Pay extra special attention to the hinges. If you happen to get any paint of them, just wipe the paint off with a damp cloth. Because the paint is water based, it's easy to wipe off straight away, so don't wait for it to dry before trying to clean it off.
Paint two coats of your final colour. Trust me, it's worth the effort. Take your time, pop on a podcast and enjoy being present in the moment.
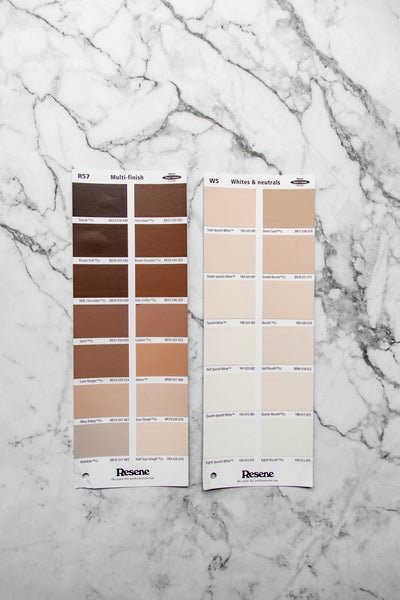
A note about the primer - the stain on the original timber seeped through the first layer of primer but after the second coat, it was gone. The experts at Haymes Paint in Noosa recommended to always apply two coats of white primer when painting timber furniture before applying the final colour. If you don't do this, the stain in the existing timber might (or most definitely) seep through and affect the tone of your final colour. And no one wants that.


Choosing Finishes
The next decisions to make were the finishes, in particular the door knobs and the hutch doors. I knew I wanted the door knobs to match our brushed brass kitchen mixer from ABI Interiors for continuity throughout the house, but I couldn't decide between the Pika and Elsa cabinetry knobs. Again, I threw the decision out to my lovely community on Instagram and the votes were overwhelmingly in favour of Pika. And that's what I chose - happy dance!
Installing Glass In The Hutch Doors
I also wanted to pop out the middle panels of the hutch doors and replace them with something else for added texture. I knew by adding a little "wow" factor to the hutch doors, that I would be able to take this upcycle from just an everyday painting and cabinetry door knob switch out into something truly special. I was interested in popping out the panels and installing glass or rattan. Once again, I was undecided so no surprises here, I asked what everyone thought on Instagram. The majority voted for rattan but this didn't sit right with me. Rattan has been having a very big moment for the last few years and now that there are versions of rattan at every major low cost department store, it just didn't feel special nor did it really sit with our interior style.
I had considered seeing if I could source some lovely stained secondhand glass from our local tip shop, but then my lovely bestie from We Are Triibe suggested I try installing the hutch doors with reeded glass, which is also known as fluted glass. I fell in love with the idea right away and i found a glass fitter on the Sunshine Coast that could cut reeded glass to size. So happy! If you're interested in doing this yourself, call your local glass supplier and see if they can cut glass to size, and whether they can source the glass for you or if you can bring in your own. If you you want to use your own glass and you're looking for something truly unique, try sourcing stained, frosted or coloured glass from your local tip shop. They have plenty of secondhand sheets lined up ready to be used for a project like this. Most glass suppliers will cut glass to size no matter what the glass is and where it comes from! You can get them to install it or you can do it yourself. Here are the steps including the materials you will need to use:
Remove the doors from the hutch. Then remove the existing door knobs and put the screws aside in a safe place.
Paint the doors first. Refer to my steps above in the "Painting, Painting, Painting" section to find out how to do this properly.
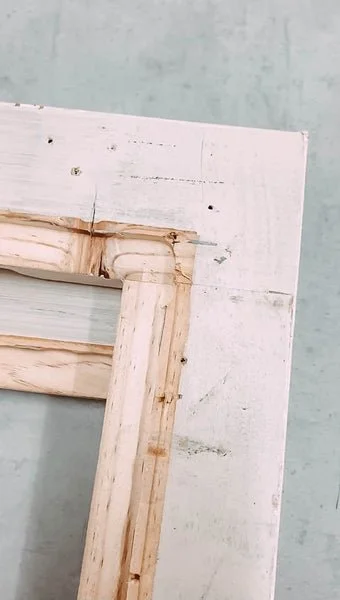
Check you can pop out the middle timber panels without affecting the profile of the doors. If this is not possible, you may not be able to replace them with glass. If this is the case, give rattan a go by cutting it to size and gluing it directly onto the glass!
Check and double check the measurements of your piece of glass, including the thickness. The thickness of the reeded glass from the supplier I used was 6mm.
Rebate the edges using a rebate tool. I could only rebate the frames by 4mm due to the (beautiful) profile of the doors, which was totally ok. If you don't mind too much what the doors look like on the inside, it's totally fine if the glass is a little thicker than your rebate.
Get the glass cut to size and make sure the edges are rounded off slightly.
Apply a translucent silicone glazing sealant specifically for glass (which I have linked above in the Materials section) around the edges of the rebated frame, then gently place the glass in, push down slightly and immediately wipe off any excess silicone that may have been squeezed out between the timber and glass. Let it dry as per the instructions and then the doors are good to go.
Screw the doors back onto the hutch. I used a couple of books to help prop up each door while doing so. It took a bit of effort because some paint had made it's way into the screw holes but with a bit of grit, the nails went in with a screwdriver. You could try using an electric drill but I was nervous it would split the timber, and thought it would be safest to hand screw the nails back in, even if took longer.


Installing New Door Knobs
Speaking of the hutch doors, they have beautiful weathered hinges on them and instead of cleaning and polishing them up, I decided to leave them as is. I love mixing old with new, so having new paint, and new door knobs, and new reeded glass, I knew I had to leave the existing hinges as they were.
Once the doors were finished, I lined the edges of the glass with paint tape from Bunnings and touched up some marks and dints that occurred during the glass installation phase with paint. I didn't realise but while I was painting, some of it splashed onto the glass. The paint had dried onto the glass but I easily removed it with a paint scraper from Bunnings (also known as a joint knife). Then I screwed in the new door knobs from ABI Interiors - this was so easy, which you can see here in this quick Instagram Reel. It was as simple as pushing the screw through the existing screw hole and then twisting the knob onto the screw. I was actually quite impressed at how easy it was and it's got me thinking - where else can I add door knobs at home lol. It took one minute to do both, seriously. Then I screwed the doors back onto the hutch, and I cannot tell you how satisfying that moment was! And here we are. Yay!


The Big Reveal
Thank you so much for sticking with me during this upcycle transformation. As I said earlier, I could not have done this without your guidance and vested interest over on Instagram. It was also so lovely seeing a few of you create your own Before & After upcycled bookshelf and hutch projects during this DIY - thank you so much for sharing these projects with me, and for swapping all your tips and tricks. You guys are truly amazing!