
Make our Rustic Apple Pie
I have always wanted to make a traditional apple pie from scratch. It’s just been one of those recipes I have always thought about, but haven't had the confidence to try making it myself. Until a few weeks ago. My parents were coming over for lunch in our new garden and I wanted to make something special.
This recipe was developed after a few fails, and it's completely made from scratch, so you will definitely need a couple of hours to set aside over a single day or a couple of days. But don't let that turn you away. The beauty about this recipe is that the pastry is super easy to make. You can actually make the pastry the day before you bake the apple pie.
I hope you enjoy the recipe!
Ingredients
Pastry
2 ½ Cups plain flour
½ teaspoon salt
90g copha, chilled and coarsely grated
100g unsalted butter, chilled and coarsely grated
½ cup ice water
1 egg, lightly whisked (for glazing)
Filling
1kg of peeled, cored and diced granny smith apples
1/3 cup organic plain flour
1/3 cup caster sugar + 2 tablespoons for lattice
½ cup brown sugar
2 tablespoons lemon juice
¾ teaspoon ground cinnamon
¼ teaspoon ground ginger
¼ teaspoon ground nutmeg
50g unsalted butter, diced 1cm cubes
Equipment
Ceramic pie dish
Rolling pin
Pastry brush
Oven mitts
Steps
For the filling, mix the flour with the salt in a bowl. Add the copha and butter. Using your hands, mix through the copha and butter with the flour until the mixture is a dry crumble.
Slowly add the chilled water a little bit at a time. You may not need to use all of the water; you only need enough water for the mixture to just hold together.
Divide your pastry into half, shape both halves into a ball then squash the balls into thick disks. Wrap with cling wrap and place in the fridge for a minimum of 30 minutes.
In a big bowl combine your filling ingredients, except the extra 2 Tbsp of caster sugar, 1 egg and the butter, in a big saucepan and cook on a medium heat until the apples collapse and loose their crunch. Taste the apples throughout this process. Once you are happy with the texture of the apples, set aside in the fridge and allow to completely cool. Stir occasionally so the apples cool down quicker.
Remove your pastry disks from the fridge and let them rest for ten minutes.
Flour both surfaces of one pastry disk and roll out till it's approximately 3mm thick.
Drape the pastry over a rolling pin and transfer to a pie dish. Using the rolling pin ensures that the pastry doesn't split whilst you transfer it into the pie dish. If it does break, don't stress. This is a rustic apple pie after all!
Gently push the pastry into the corners of the pie dish; you may need to lift the overhanging bits to help you do this. Trim the sides of pastry off with a knife or push down and peel off with your fingers. Place the pie dish in the fridge and let it chill for 15 minutes.
By now your filling should be chilled. Take the filling and the pie dish out of the fridge, pour the filling into the pie dish and make pat down to make a mound. Place the filled pie dish back into the fridge.
Preheat your oven to 200 ºC.
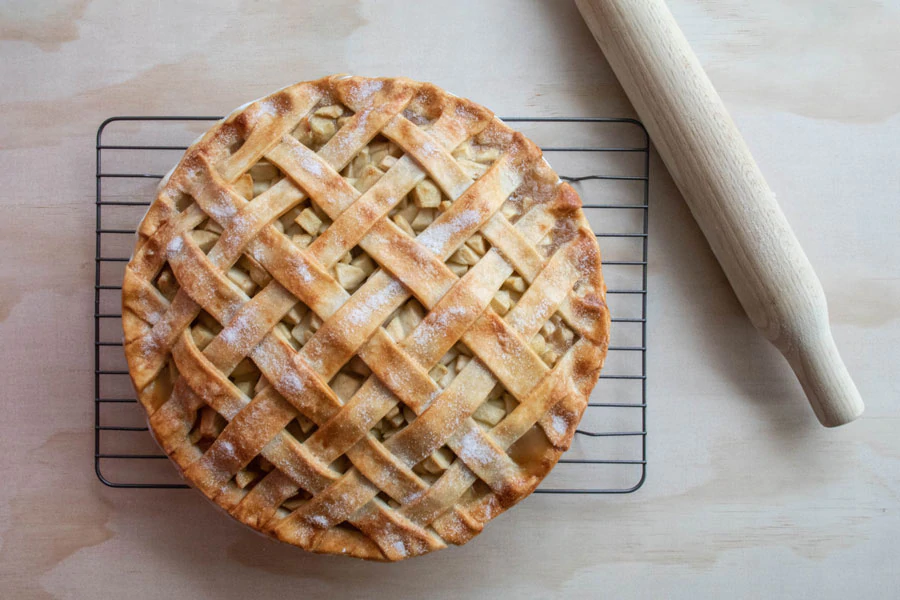
Now it's time to make and construct the lattice, it's so fun! Being by rolling the remaining pastry disk into a 3mm thick circle onto a floured surface. Using a knife cut the circle in half, and then into even 2cm strips. You can get a ruler if you'd like, but I didn't use one. To make the lattice, here is an old but great YouTube video and is relevant to this recipe from 35 seconds onwards. I thought this would be a much easier way to show you rather than tell you. Don't pay attention to the measurements, but pay attention to the actual construction of the lattice.
Once you have watched the video, take your pie out of the fridge and start assembling the lattice leaving a 5mm gap between each strip of pastry. I like lots of lattice, but you may like less. It's totally up to you. Work as quickly as possible so the pastry doesn’t soften too much from the heat of your hands and the temperature of the room you're working in.
Once the lattice has been completed trim the excess pastry off with a knife and crimp the edges with your fingers or use a fork to press and seal.
If you can see your lattice has become really soft from handling, pop the pie into the freeze for 15 minutes. If it looks fine, place the pie into the oven and bake for 15 minutes.
Using the oven mitts, remove the pie from the oven, turn the heat down to 180ºC, and glaze thoroughly with egg wash and sprinkle evenly with the remaining 2 tablespoons of caster sugar.
Return the pie to oven using the oven mitts and bake for 35 to 45 minutes or until the crust is beautifully golden. If you feel the apples need more time, or if the crust is becoming too golden, cover the pie loosely with aluminium foil.
Remove the pie from the oven with the oven mitts and set aside to cool for 10 minutes before serving. You want to eat the pie when it's still warm, but not too hot where it burns your mouth.
Serve with vanilla ice cream or custard. Yum!


